ScreenConnect – Integration With Secret Double Octopus SAML Authentication

Welcome!
Welcome to our blog! In today’s post, we will detail out the process to integrate ScreenConnect (Also known as ConnectWise Control) authentication to the Secret Double Octopus platform via SAML 2.0. This guide works for both self-hosted instances and cloud instances of the ScreenConnect platform. Integrating Secret Double Octopus to be your authentication provider allows you to provide secure, phishing-resistant passwordless MFA to your ScreenConnect platform. This increases security and reduces attack surface overall. You will need to have administrative privileges for both ScreenConnect and Secret Double Octopus before proceeding.
Before digging into the details and setup, here is a quick demonstration video of what the end user experience looks like once this is configured:
Part 1 – Secret Double Octopus Configuration
ScreenConnect requires four (4) attributes at a minimum to be configured and sent to it during the authentication process. One of these attributes will require a bit of planning. We need to specify the role of the user in a SAML attribute. The role must match the role name in the security section of the ScreenConnect admin settings. Below is an example of the default roles. If you have created custom roles, you will need to add these to the user object to be passed through to ScreenConnect.

In this tutorial, we will be showing how to add the role to a user object via an Alias field within the Secret Double Octopus platform. If you wish to import this role from a directory attribute, please feel free to reach out to us for additional details on how to extend the schema and import additional attributes automatically.
Part 1A – Create the SAML Service
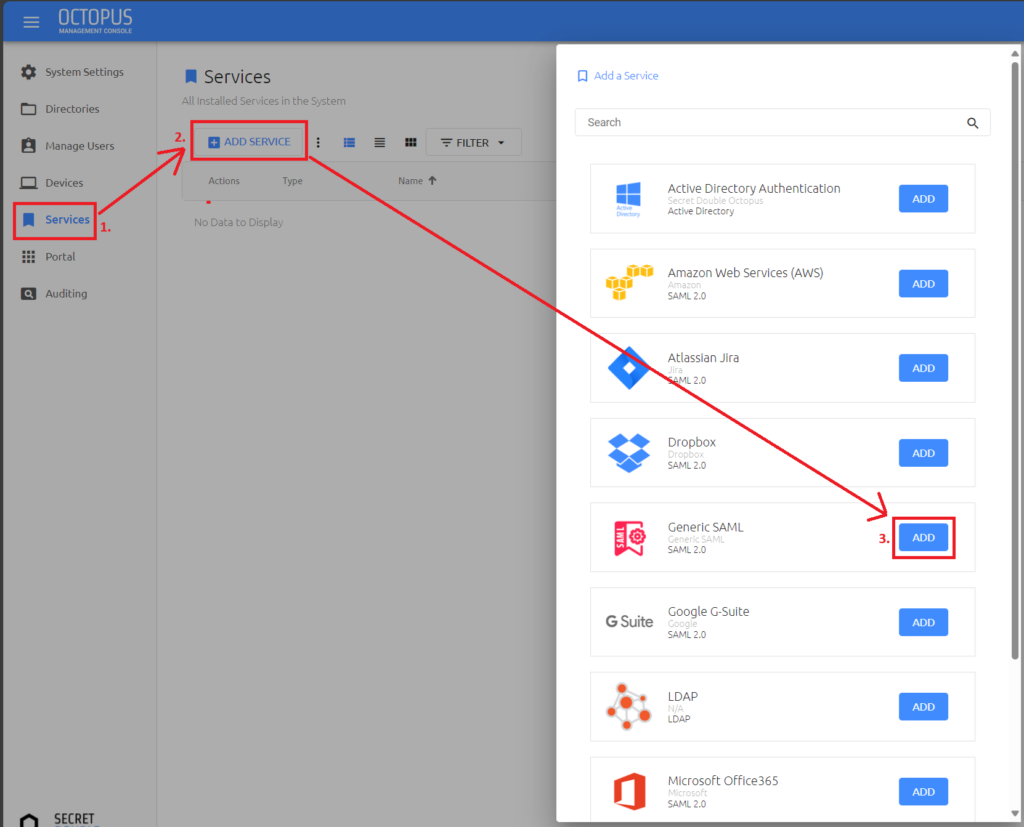
First, we will start with Secret Double Octopus and create a SAML service for authentication. Once logged into the SDO Management Console, click on Services in the left-hand navigation menu and then click on the ADD SERVICE button in the right-hand pane. In the window that pops up, click on the ADD button next to Generic SAML.
Give the service a name and click on the CREATE button

Part 1B – Create the Required Attributes
In the top-line menu of the SAML service, click on the PARAMETERS tab

Scroll to the bottom of the page and enter in a fake URL into the ACS URL field. This field is required to be filled out to save changes, but we will not get the proper ACS URL until a later step in ScreenConnect, so we will use a fake URL for now. Once filled in, click on the ADD PARAMETER button four times to add four new parameters/attributes to send to ScreenConnect during the authentication process.

In the new parameters that were added, enter in the following parameters. *Note, we will use USERNAME as a placeholder on the FirstName parameter as we have to override this on a per directory basis, this is performed in a later step*
Once you have created all of the parameters and have the temporary ACS URL filled in, click the SAVE button at the bottom of the screen.
| Parameter Name | Parameter Value |
| FirstName | USERNAME |
| DisplayName | Display Name |
| Role | ALIAS3 (Select the appropriate Alias number you plan to use for the Role) |

Part 1C – Add the Directory and Users
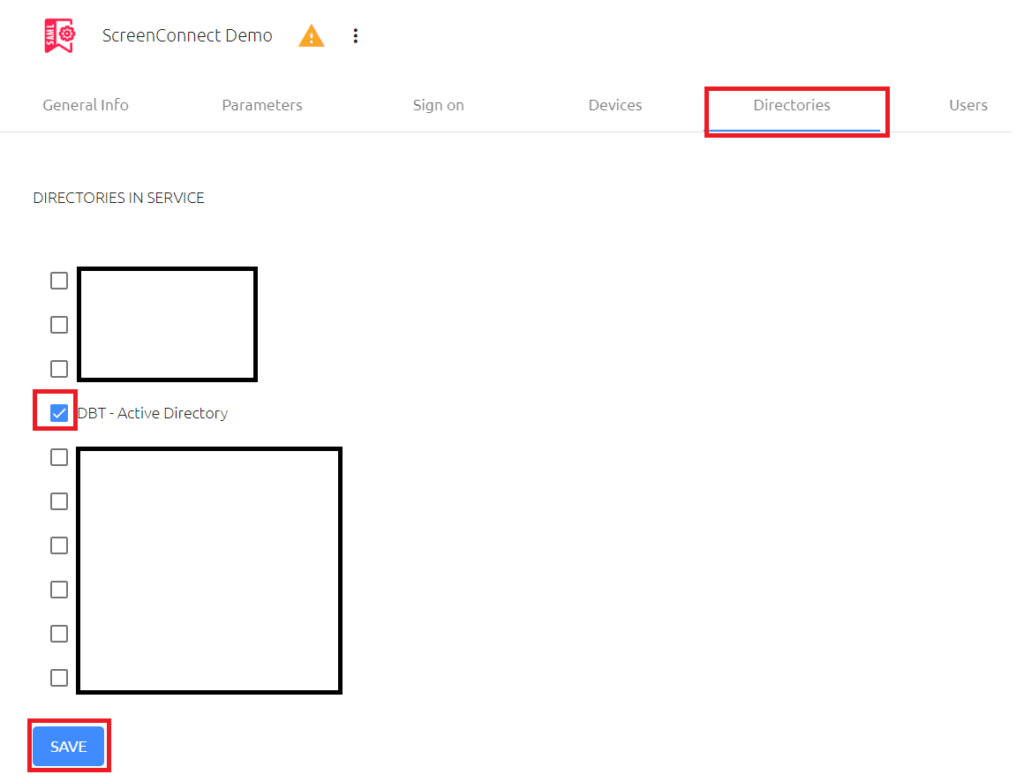
In the ScreenConnect SAML configuration, select Directories from the top line menu, then add the appropriate directories to the SAML service and click the SAVE button at the bottom
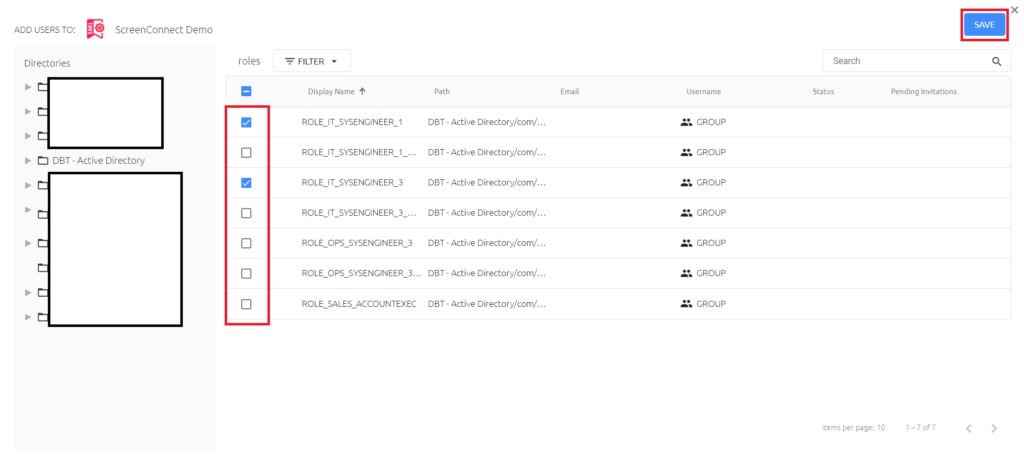
Click on the Users menu tab in the top-line menu. Click the ADD button to open the user and group selection window.

In the window that opens, browse the correct OU, find your users and/or groups and add them to the service by checking the box next to the user or group and then clicking the SAVE button in the top right corner of the pop-up window
Click the PUBLISH button at the top of the Management Console page and publish out the changes to the SAML configuration to activate it.

Part 1D – Finalize the FirstName Mapping
In the Parameters tab of the SAML configuration, click on the Service Parameters drop down and select your directory
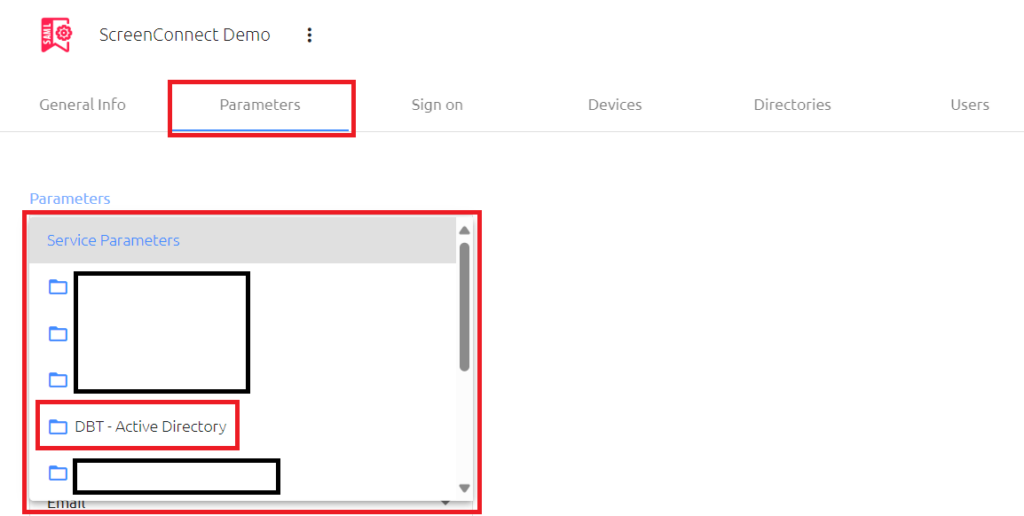
Scroll down to the FirstName parameter, check the box next to it and change the drop down menu to be GivenName then click on the SAVE button.

Publish your changes in the SDO Management Console before proceeding with Part 2.
Part 2 – ScreenConnect Configuration
1. Open the Security Page
Open Administrator > Security page
2. Add User Source
Click Add user source and select SAML to add a new SAML user sources block

3. Enable SAML Block
On your SAML block, select Options > Enable

4. Configure SAML Block
In your SAML user source block, click Options and select Configure

5. Input the Configuration Details
| IdentityProviderMetadataUrl | Obtain Metadata URL from the SDO SAML Service > SIGN ON Tab > SAML Metadata URL Field |
| UserNameAttributeKey | FirstName |
| UserDisplayNameAttributeKey | DisplayName |
| EmailAttributeKey | |
| RoleNamesAttributeKey | Roles |
| DisplayName | SDO Authentication (This is the name shown on the main ScreenConnect Login Page) |

5. Generate Metadata
On your SAML user block, click Options > Generate metadata. This will open an XML document in a new browser tab. Copy the EntityID out of the XML file that opens. Save the EntityID in Notepad, it will be used in the next step

Part 3 – Complete Secret Double Octopus Configuration
Edit the ScreenConnect SAML service in the Secret Double Octopus management console.
1. Add the EntityID to the SAML Configuration
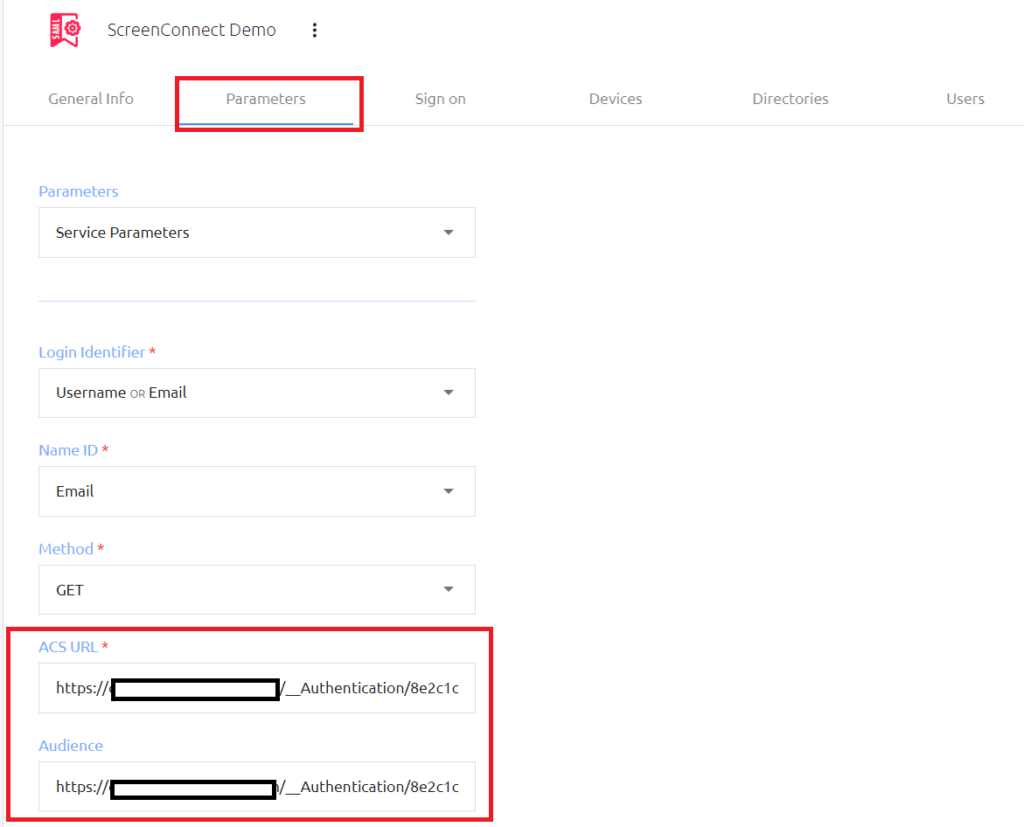
Go to the Parameters tab of the SAML service and pase the EntityID copied from the ScreenConnect Metadata.xml file into the ACS URL field and the Audience Fields
2. Save the Configuration and Publish
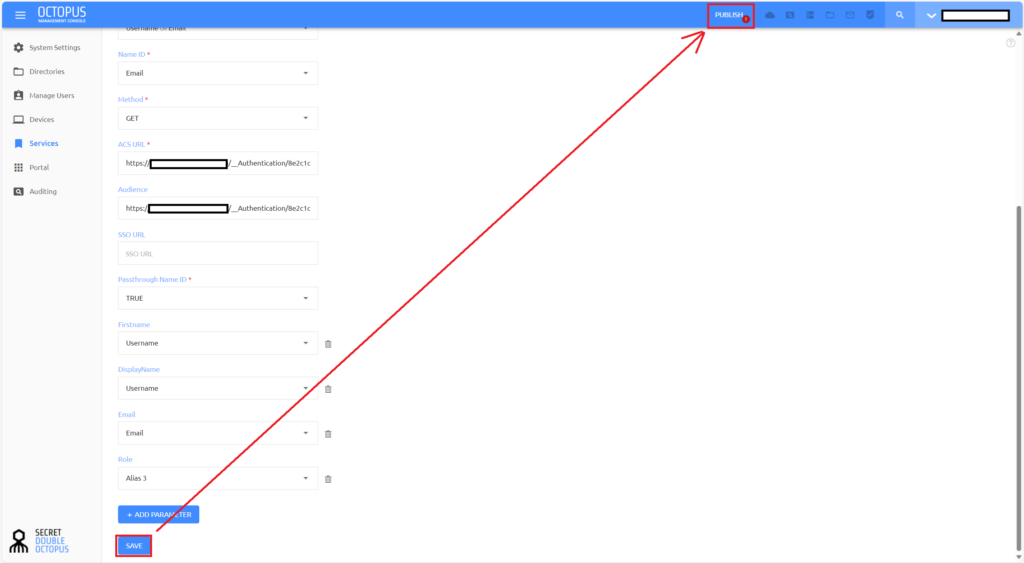
Click SAVE at the bottom of the screen and then PUBLISH in the management console top menu to complete the configuration.
3. Assign Roles to Users
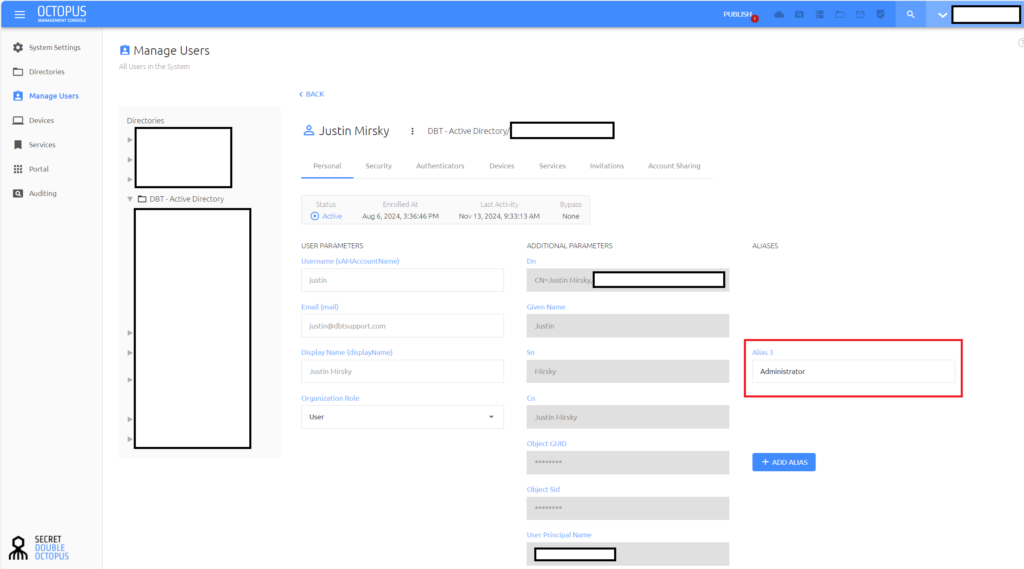
In this demo, we are assigning the roles for ScreenConnect via the Alias3 field in Secret Double Octopus. Follow the below steps to add the role to the Alias3 attribute.
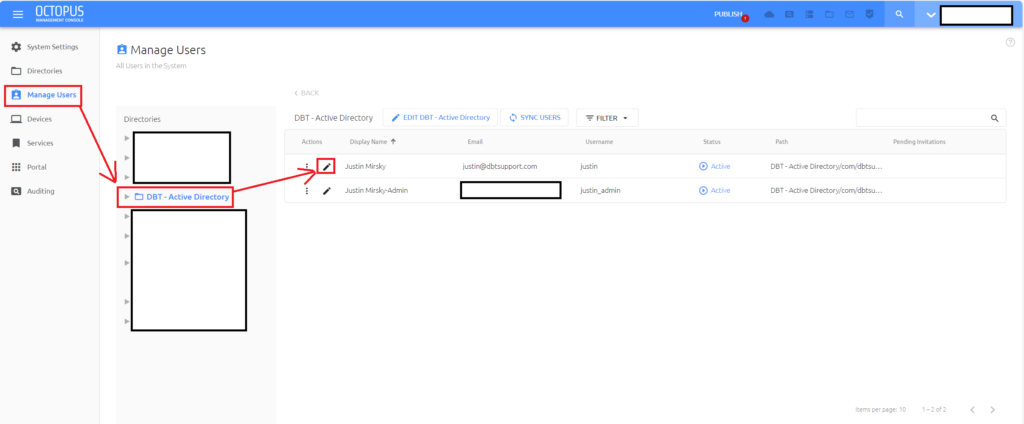
In the left-hand navigation menu, select Manage Users. Select your directory and then find the user object you want to add a role to. Edit the user object with the pencil icon.
In the Personal tab of the user profile, add the role name to the Alias you selected (Alias3 in our demo)
Final Product
Now that everything is configured, you can test your authentication by going to your ScreenConnect authentication page. You should see a button to log in using Secret Double Octopus as shown below. Click on this button to be redirected to SDO for authentication. When the authentication completes, you should be returned back to your ScreenConnect instance, signed in.

That’s All Folks
That’s a wrap on this write-up. I hope you found this information useful. If you are an existing SDO customer and would like assistance with integrating ScreenConnect or any other application into the platform, please CONTACT US to request a consultation or assistance.